Agencies have the ability to define all DVIR inspections and failure reasons, to match agency's specific damage reporting requirements for DOTs, vehicle operators and for maintenance reporting needs. DVIR screens are fully customizable and easily managed by the agency.
Electronic DVIRs are viewable on the MDT at any time, as long as the vehicle is stationary. If the vehicle operator needs to make changes for what has been reported for the current vehicle login, those updates can be documented/saved via the DVIR screens. DOTs also have easy access to the DVIR screens, if requested to view.
Ease of Deployment: DVIR deployments can be managed by maintenance managers, or those dedicated by your agency. Simply create DVIR screens in Operations on the Inspections Settings tab. Save the DVIR inputs, then navigate to Build & Deploy to set up the files for download.
The new DVIR files become available when the vehicle is cycled/logged in to. In some cases, a vehicle reboot may be needed to populate the DVIR checks on the MDT. WHY: All files scheduled for use in fleet vehicles are downloaded then stored in the vehicle IVU (in-vehicle unit). A reboot triggers use of the new files. When the files are available on the MDT, the vehicle operator will complete the DVIR checks first, then proceed to the three standard pre-trip checks (1. ADA announcements, 2. APCs, 3. wheelchair ramp cycling).
- Check Screens
- Failure Reasons
- Body Damage
- Submit Pre-Trip Results
- Load Stored Results for Driver Change (Optional)
Check Screens
Use the DVIR vehicle inspection check screens to record various equipment failures as defined by your agency.
To use the check screen:
- Press the green check mark icon
for all inspection checks that do not have problems.
- Press the red X button
for any inspection check that fails. Another screen will automatically open to document the issues/Failure Reasons.
- After selecting either a
to continue to the next screen. The MDT records your selections.
As in the MDT screenshot above, the next button will be disabled and appear greyed out until you complete all items for each vehicle inspection screen.
Vehicle inspection screens that occur after the first vehicle inspection screen will include a previous button for returning to previously completed screens, as well as the next button for moving forward from completed screens.
Failure Reasons
The example below illustrates the brake lights were failed:
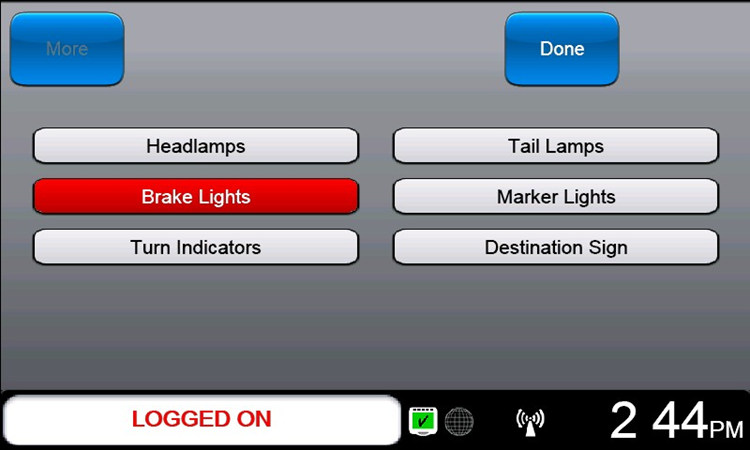
When you press an X to fail an inspection, the MDT automatically opens a screen that displays failure reason codes. Simply touch any/all reason codes needed.
To use the failure reason screen:
-
Press a failure reason button to toggle it between
and
indicates that the operator did not observe a Headlamps failure in the external equipment check.
indicates a failure. In the example above,
indicates that the operator found a brake light failure in the external equipment check.
- If the More button is enabled, press it to view additional failure reason screens.
- After you select all applicable failure reasons, press the done button
to return to the vehicle inspection screen. The MDT will remember your selections. If you accidentally open a Failure Reason screen, you can press the Done button without making any selections. You can return to the Failure Reasons screen by pressing the
Body Damage

After the standard Vehicle Inspection Check screen(s), there may be a set of Body Damage screens, which provide an area for the operators to report any visible vehicle body damage. The Body Damage screens are configured to match your vehicle type.
To use the body damage screen:
- If there is any damage to the body or glass on the vehicle, touch the area of the bus to indicate the location of the damage.
- When you press a body location, the MDT opens a Failure Reasons screen.
- When you click the Done button in the Failure Reasons screen, the MDT will return to the Body Damage screen.
- All undamaged body locations on the Body Damage screen will appear transparent.
- All damaged body locations will appear solid white.
- If you need to go back to a previous inspection screen, press the Prev button. The system will remember your selections.
- Press the Next to move to the next body damage inspection screen, which will show a different view of the vehicle. The Next button is always enabled for Body Damage screens. You only need to record damages if they exist.
Submit Pre-Trip Results

The Submit Pre-trip screen allows you to submit pre-trip inspection results or to redo the inspections.
To use this screen:
- Press the Submit button to finish the inspection and send the results to dispatch.
- Press the Cancel button to start pre‑trip tests over with a clean slate.
- Alternatively, press the Prev button to review or modify previous inspection results.
Load Stored Results for Driver Change (Optional)
myAvail can be configured to allow operators to bypass vehicle inspection when performing driver changes during a service day. This option is available to eliminate the work time required to perform vehicle inspections at driver change.
- This feature must be enabled to function. Contact your Avail representative for more information.
- This feature only works during a vehicle service day, and only if the myAvail in‑vehicle system has not completely powered down.
- This feature will still work if the ignition is turned OFF, and with the myAvail in‑vehicle application still running on the MDT. This may be helpful in areas where vehicle idle laws are in effect.
The myAvail in‑vehicle system will eventually shut down with the ignition OFF. The shutdown time depends on configuration settings, and whether an operator is still logged on or not. An ignition-OFF shutdown is necessary at some point to prevent battery drain.
Once enabled, the new operator will see this MDT screen immediately after pressing the Logon button on the Logon screen:

To use the previous operator’s vehicle inspection results, the new operator should press the Load Stored Results button.
- The MDT will still display the Vehicle Inspection screens, but they will be populated with the previous operator’s results.
- The new operator can modify the vehicle inspection screens if new failures are found on the vehicle.
- The new operator will still need to perform the Pre‑trip Manual Tests.
The new operator can alternatively press the Clear Results and Start Fresh button. This will start the Pre‑trip tests from scratch.