The administrative functions section allows you to manage your bookmarks and scheduled reports. To access these functions, click Admin in the menu path across the top.
![]()
Bookmark Administration
Bookmarks are a doubly handy feature in Avail’s Business Intelligence (BI). Bookmarks not only help you find a specific report, but they also preserve the filter settings that are in place when you bookmark it. For example, if you access a default report and then customize it by using the Filter panel to answer a recurring question, bookmark it to quickly access your customized version the next time you need it.
To add a report to the Bookmark Administration screen, click the icon that appears on the report pages. Enter a description that allows you to differentiate the new customized report from other customized reports. These descriptions help you identify a particular customization in the list of Report Titles on the Bookmark Administration page.
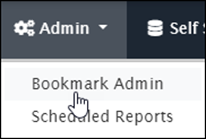
To manage the reports that you have bookmarked, click Admin in the menu bar and choose Bookmark Admin. Business Intelligence displays the following screen, which lists bookmarks in the current folder and presents actions that you can initiate.
On this screen, use the icons to perform the following actions:


Run the report in a new
 Download the report as a
Edit the description of the This description appears after the hyphen in the title.
-
 Delete the
Bookmark Folders
Bookmark Administration allows you to create a folder structure that organizes the reports you bookmark. When you access Bookmark Administration, the system takes you to My Items, which is the top-level reports folder. When you bookmark a report, BI adds it to this folder.
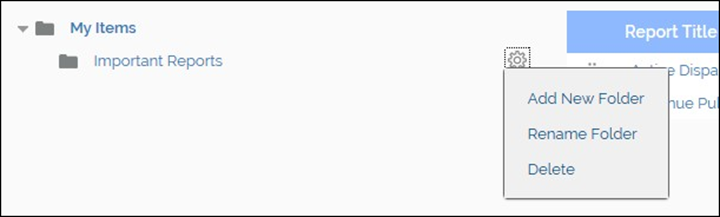
To manage the folders, hover the pointer over a folder, and then click the gear icon that appears to display a popup menu. You can only create sub-folders when you are in the top-level My Items folder. However, when you are in a sub-folder, you can also use the gear icon to create, rename and delete the sub-folders, as shown below.
To move a report between folders, click and hold the report’s grab icon  and drag it to the correct folder.
Scheduling Reports to Run Automatically
Avail’s Business Intelligence can run and distribute reports to specific users automatically. To run a report automatically, click the icon that appears on the upper-left portion of some report pages. Clicking this icon displays the popup shown below.

To schedule a report, specify the following information:
- Schedule: How frequently does the report run? Options include Once, Minutes, Hourly, Daily, Weekly, and Monthly.
- Start Time: Specify the time of day the report first runs.
- Run On: Enter the date on which the report first runs.
- Users to Email: Specify myAvail users who will receive the reports This email list shows email addresses in alphabetical order per the agency's employee list.
- Other Email Addresses: Specify other users who will receive the reports by email.
Scheduling Reports with Sliding Date to Run Automatically
The Sliding Date function allows the agency to review historical data on a consistent basis, by adjusting the sliding date criteria accordingly and then scheduling the report.
If you need to schedule a report with a sliding date you must bookmark it (top left of the screen). Scheduling a standard report (not bookmarked) results in the report always returning with the data from the date they had selected at the time of scheduling.
To schedule a report with a sliding date:
- Open the report you wish to schedule (i.e. Incomplete Segments by Route).
- Click on the Filter tab at the top right of the report.
- Select the Sliding Date radio button.
Select the Start and End points (i.e. Last Month Start to Last Month End).
NOTE: When the report runs, the starting and ending dates will be populated with the sliding dates and displayed at the top of the report. In this example, Last Month Start was 05/01/2023 and Last Month End was 05/31/2023.
- Select the top
button to set the date range.
- Choose your report parameters and select the
button at the bottom of the filter panel to lock the report parameters in place.
- Select the
icon in the top left corner of the report.
- Enter the description of the report and click
.
- Click Bookmark Admin from the Admin drop-down menu in the BI window.
- Locate and run the report you just saved by clicking the report title or the
button.
- To ensure the filters are locked to your choice, please review them in the Filter panel before scheduling the report.
- To schedule the report, click on the
icon in the top-left corner of the report, select your schedule parameters, and click the
button.
Scheduled Report Manager
To manage scheduled reports, click Admin in the menu bar and choose Scheduled Reports. Business Intelligence displays the following screen.

This screen displays the reports you have scheduled using the process that the previous section describes, and it allows you to manage them. The report table displays information about the scheduled reports, including the title, the date the report was first scheduled, whether it is currently running when it was last run and whether there were any errors, when it will run next, who receives the report, and information about the report parameters.
In addition to viewing information, this page allows you to perform the following actions. By clicking in the Enabled column, you can toggle between enabling and disabling a report.
Checkmarks indicate that a report is enabled and will run automatically. Use this function when you want to temporarily disable a report.

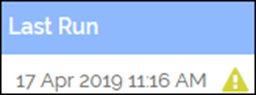
The Last Run column indicates when reports were run most recently. If the Last Run column contains an exclamation point, as shown below, it indicates that the report produced an error the last time it ran. Click the indicator to view the log file to understand the nature of the error.
Click the icons in the table to perform the following actions:
Delete the schedule
Edit the schedule for when the report runs. Clicking this icon displays the popup shown below. The options in this popup are the same as the popup that creates the schedule.

The last column in the table is Process Params. Click the icon to display the report parameters. An example is shown below.
