Publishing a schedule is structured process, and each step plays an important role in ensuring a successful outcome. Here is a high-level overview of the process to give you an idea of the scope of publishing a schedule. Each item of this overview list links to the full details of the Process section.
- Coordinate with Avail Support
- Prepare to import the Schedule Files
- Upload Schedule Files
- Import
- Resolve Import Errors
- Double-check Scheduled Service
- Confirm Scheduled Miles and Hours
- Validate the Schedule
- Build the Schedule Files
- Deploy Schedule Files
Process
The Data Import process is used as a first step in a schedule deployment.
-
Coordinate with Avail Support
- Submit a low-priority support case in the customer portal 2 weeks in advance of your schedule data import with the date of the upcoming schedule data import.
- The case will be updated and the status will be changed to Pending Customer Review upon arrival. The case will be for reference purposes only.
-
Prepare to Import the Schedule Files
- Collect the Schedule files from your scheduling provider
- NOTE: Block numbers should not exceed six digits. Data import process will error if this limit is exceeded. Longer block numbers can generate run file names that exceed the legacy naming convention used by some components and may prevent schedule files from being processed correctly. If necessary, update the block numbers in the scheduling package before importing the files.
-
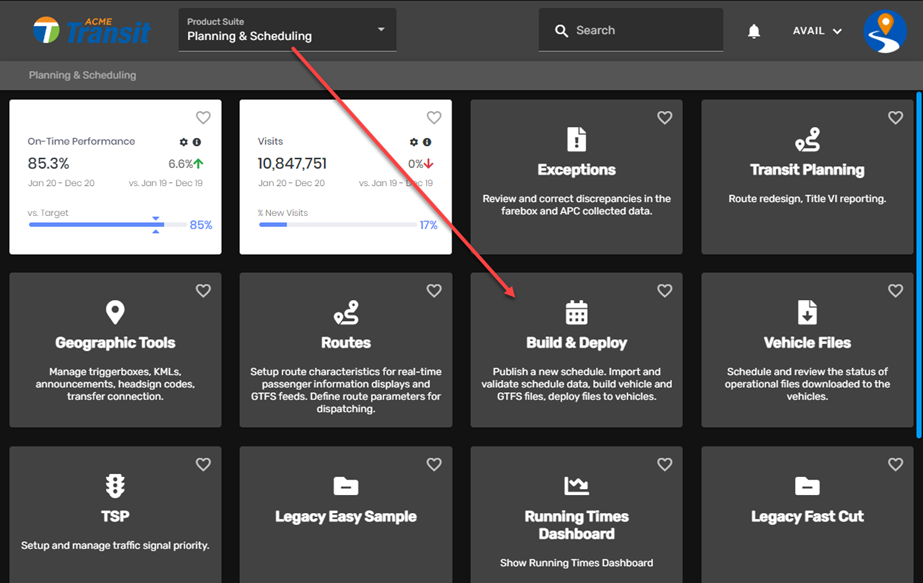
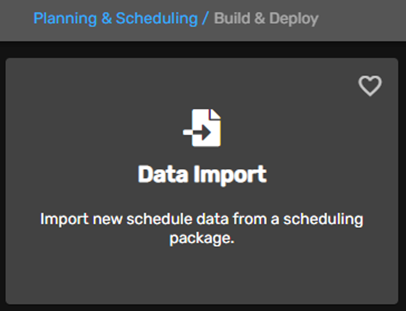
Navigate to ETMS/Planning & Scheduling Suite/Build & Deploy/Data Import Card
The
 import screen is used to locate and import your schedule files.
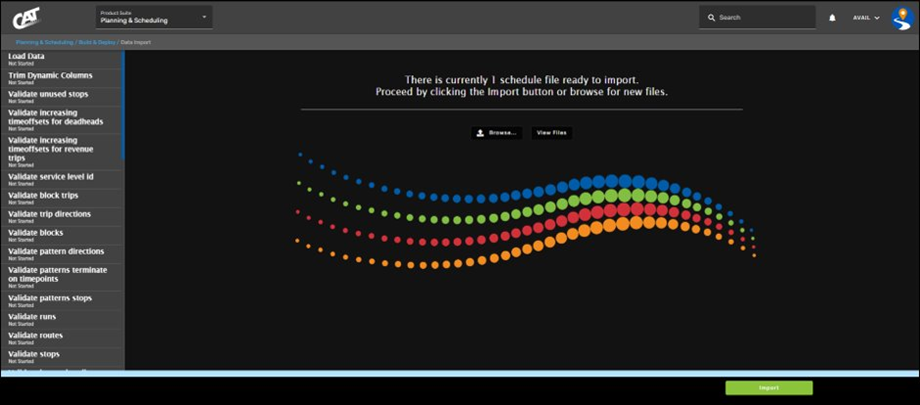
When the import is completed, you can review the files in the View Files button to ensure all files are present. When all files have been verified, you then select the Import button.NOTE: The 1 schedule file displayed at the top center of the image above is a reminder of where your schedule files are imported. Clicking the View Files button will indicate that it's a placeholder.
-
Upload Schedule Files
- Select the Browse button on the import screen to upload schedule files.
- Locate the folder of your schedule files.
- Select all schedule files:
- Hold Ctrl and click each file, or
- Highlight all files by clicking and dragging your cursor, or
- Highlight the first file, then press and hold the Shift key while clicking on the last file, or
- Press the Ctrl + A keys
- Click Open once you are finished selecting the schedule files.
- This will import the files into the Import Screen. Review the imported files by selecting the View Files button.
- If all files are present, select the Import button on the Import Screen.
- Select the Browse button on the import screen to upload schedule files.
-
Import
- After the files are imported, the left side of the screen (see snip below) displays the validation tests that are performed against the imported data to ensure the schedule data files are correct and contain no errors, and comply with the Avail import process.
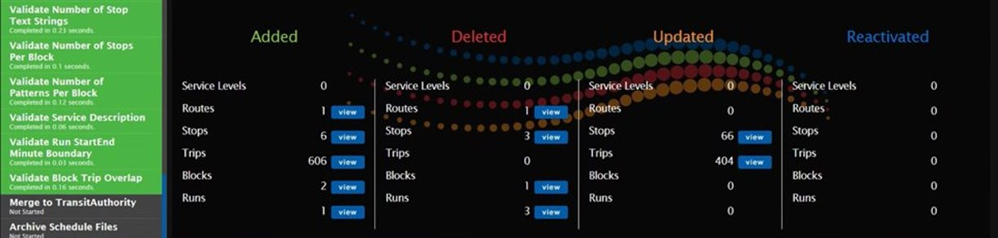
- It is important to pay attention to the colors as the system moves from one check to the next
- Green indicates success
- Orange indicates warnings (Avail recommends addressing these)
- Red indicates a critical failure (cannot proceed until corrections are made in the schedule data package)
- After the files are imported, the left side of the screen (see snip below) displays the validation tests that are performed against the imported data to ensure the schedule data files are correct and contain no errors, and comply with the Avail import process.
-
Resolve Import Errors
- If errors are noted, they must be corrected in the scheduling package, then re-import the corrections.
- If a step is flagged in red during the import process, a re-import of corrected schedule data is required.
- After all errors have been resolved in the scheduling package, and you have re-imported the data with no errors, you may proceed to merge the schedule data files.
-
Double Check Scheduled Service
- After the schedule data has been imported and merged into the working schedule, service level definitions may be included with the import process, and can be reviewed in DataPoint.
- Using these service level definitions, you can review the different service level types (weekday vs. weekend, for example). These are reflected on the calendar display.
- Log into ETMS > Operations Suite > DataPoint Card
- Click Setup
- Click Work on Future Setup
- Click Update next to Service Level Definitions
-
Mouse over calendar dates to highlight what they are set to after the import/merge. You should be able to confirm that your service levels are correctly set up.
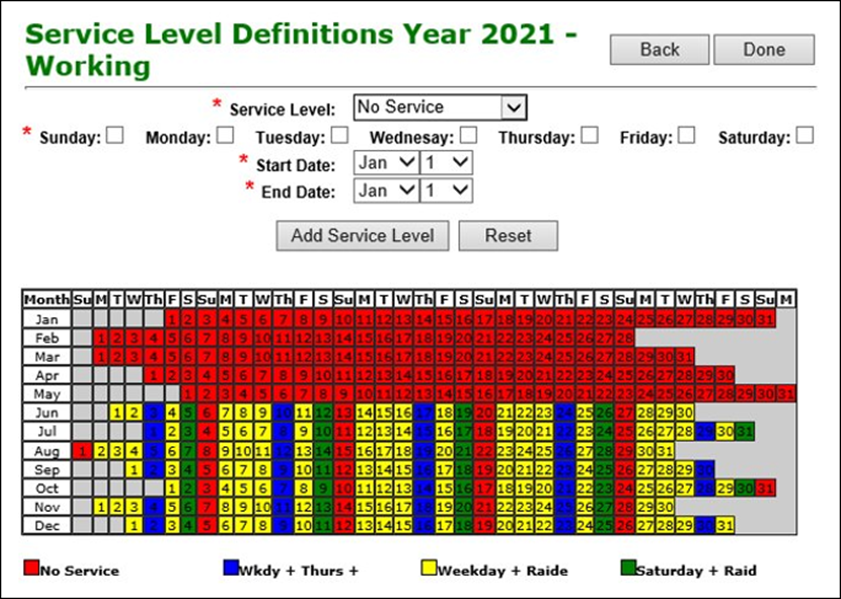 IMPORTANT: Be sure to add all service levels used for the current schedule. If service levels are not included on the DataPoint calendar, your ITS software will not recognize the runs, and vehicle operators will not be able to logon to those runs via the MDT.
-
Confirm Scheduled Miles and Hours
- During each schedule data import, you should confirm the scheduled miles and hours to ensure that they are in line with what service you expect to perform. To confirm the scheduled miles and hours:
- Navigate to ETMS > Operations Suite > DataPoint Card
- Click Setup
- Click Work on Future Setup
- Click View next to Block Scheduling
- Click Display Block Schedule History
- Click NTD next to the Future Schedule
-
Review each service level and route to ensure the correct routes are scheduled. Also, double-check the scheduled miles and hours for each route to ensure they are in line with what you’d expect
TIP: If you clicked the working schedule, you’ll need to click the Recalculate Values button to update the routes with their new miles and hours.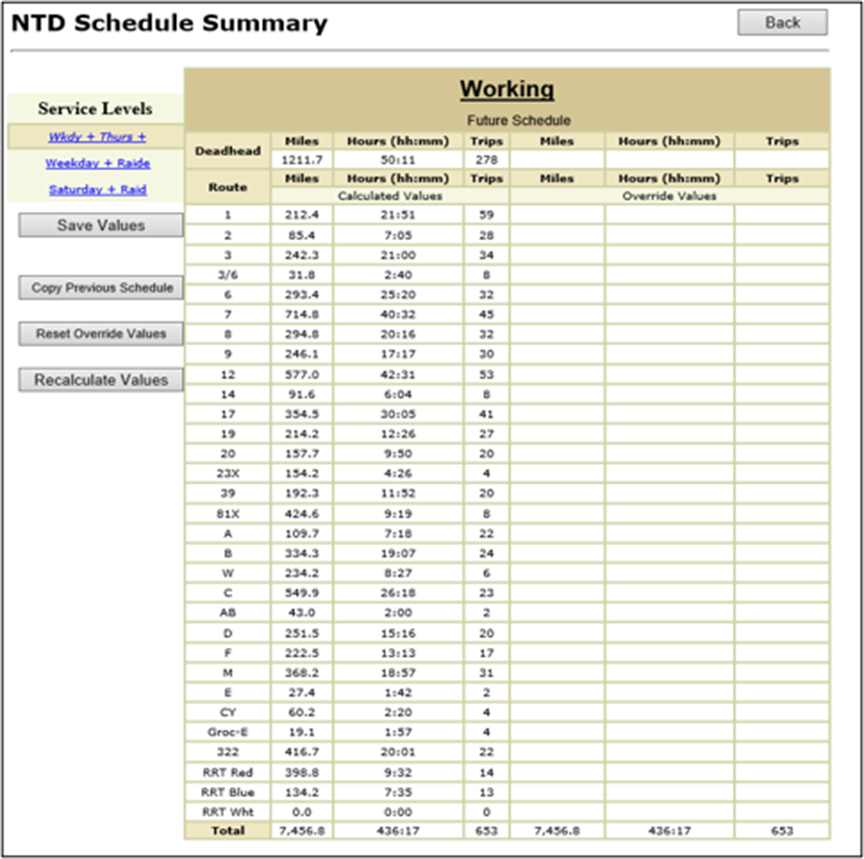 NOTE: For a new route that is being added to your schedule, outside of routes that are already built/present, the new route will not be displayed on this screen until it's published.
If you are adding a new route, you will need to check this screen before and after the schedule publish to ensure current routes are accurate and that the newly added route is also accurate. - If the schedule has a new Route, some steps need to occur before you proceed to the Validation/Build/Deploy steps. Please see Adding a New Route article for details.
- During each schedule data import, you should confirm the scheduled miles and hours to ensure that they are in line with what service you expect to perform. To confirm the scheduled miles and hours:
-
Validate the Schedule
- Navigate to ETMS> Operations > Launch Dispatch > Build and Deploy Tab
- Select Validate tab
- Ensure Future Schedule radio button is selected
- Confirm that the schedule name is correct in the Name field
- Confirm the start date is accurate in the Start Date field
- Select Validate Schedule to begin the trigger box and route trace process review
- If issues are found, please see Resolving Schedule Validation Issues.
- For information about correcting Trigger Boxes go to the Trigger Boxes article.
- For information about correcting Route Traces go to the Route Traces article.
- For information about Announcements go to the Adding Announcements to Stops article.
-
Build the Schedule Files
- Select Build tab
- Confirm Future Schedule radio button is selected
- Confirm the files to build
- Schedule Data - These are the files that the MDTs display when an operator logs in
- General Transit Files - These are the files that will generate Google Transit files that can be shared with Google Maps or other third parties for Trip Planning functionality (myStop)
- Select the Build Output Files to begin building
- For more information on the GTFS Files please review the GTFS Files and Feed article.
-
Deploy Schedule Files
- Select the Deploy tab
- Select Deployment Type and Details
- Schedule Data - is used for deploying block files, route traces, trigger box updates
- Other Files - is used for deploying annunciator files, pre-trip files, Avail fare screens, or route traces without new schedule files
- Select Start Date and Regular/Correction Publish
- Confirm Future Schedule radio button is selected
- Confirm the Start Date
- Is this a Correction? If you are only adjusting trigger boxes or headings, then select the Correction box
- Major Deployment: All other schedule changes such as: adding stops, removing stops, adding routes, removing routes, changing blocks, changing runs, adding/removing runs/blocks, adding/removing trips are not considered a Correction. These changes are considered a major publish.
- File Selection for Deployment
- Checkmark the files that you would like to deploy
- The number in parentheses indicates the number of files ready to be deployed. If you see parenthesis next to a box and are ready to deploy the files, include them by checking the box
- In this example schedule data and route trace files are being deployed to the fleet
- Schedule Data: 268 files
- Route Traces: 33
- A number in the parentheses by Route Traces indicates that there are trace updates to be deployed.
- You must check the box when you see this to include the trace updates with the publish
- Select the Vehicles button and choose 'All fixed route' vehicles (include BIB and MTS, if purchased for training and maintenance use)
- To select the vehicles that you would like to send the files to via the WLAN
- Click Vehicles
- Click Select All under the Fixed Route fleet group to include all vehicles
- To select the vehicles that you would like to send the files to via the WLAN
- Click the Deploy button to Confirm Deployment
- Deployment History - The Deployment type and date are displayed. Click on the Date to view more information: file types deployed and Vehicles that downloaded the files
- If you need to Cancel a deployment
- Click on the Date for the files you wish to cancel
- Click the Cancel Deployment button
-
This will stop the vehicles from receiving the download and stop the future schedule from going active
NOTE: Files should be set to deploy AT LEAST 5 days prior to the start date to allow time for the buses to be cycled through the WLAN access point, which enables the download to occur.NOTE: Verify all GFI data has been imported, all exceptions have been processed, system adjustments are up to date and a review of your trip samples have all been completed prior to the start date of the new schedule! - For more information on the detailed status of vehicle deployments go to the Vehicle Files Overview article.
- For more information on Geographic Tools, open the Replay article.
PRO TIPS:
- Setup schedule data deployments in advance of needing the files, to allow time for vehicle downloads
Option 1: You can also request support for the import process by entering a Customer Portal Case here: https://www.availtecportal.com/
- WHY ENTER A CASE? Case requests are tracked internally. we use the data to help us serve you better
Option 2: You may call our Technical Support Team (814-234-3394, Option 1) if you experience any issues related to your schedule data import. We'll be glad to help you through the process.
Troubleshooting References/Confirm Data Collection: Press a blue link to review the information
- Business Intelligence report - Schedule Health Video - Missed stops, missed timepoint segments, and missed trips display a threshold around or below 5%, confirming the majority of scheduled service is collecting data
- Business Intelligence report - Running Times report confirming new schedule times are correct
- Business Intelligence report - On-time performance report for service discrepancies
- Business Intelligence report - Maintenance Issues