When the user clicks on the Live Map card, the system will load all of the routes and the associated vehicles on the routes.
IMPORTANT:You may be timed out of the Live Map after 35–45 minutes of inactivity. When a timeout occurs, you are not automatically logged out; instead, a reauthentication window will appear, prompting you to log back in using your password or PIN.
You also have the option to manually log out of a timed-out session. If the reauthentication dialog remains open for 2 hours without action, the session will be automatically closed.
- If you navigate using the browser's back or forward buttons while the dialog is open, the popup will remain visible, and navigation will proceed as expected.
- If you refresh the browser tab while the reauthentication popup is active, you will be logged out.
Search Menu
Click the search icon in the left top corner to access search and filtering options.
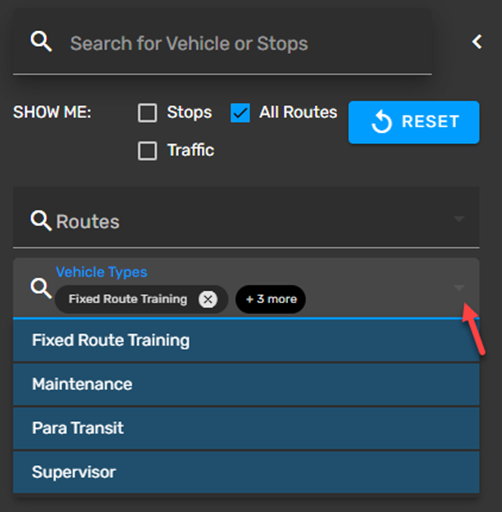
Search by Stops, Routes, Vehicle Types, or Fuel Types
When searching by Vehicle or Stops, there are now map display options to display Stops, Traffic, and All Routes.
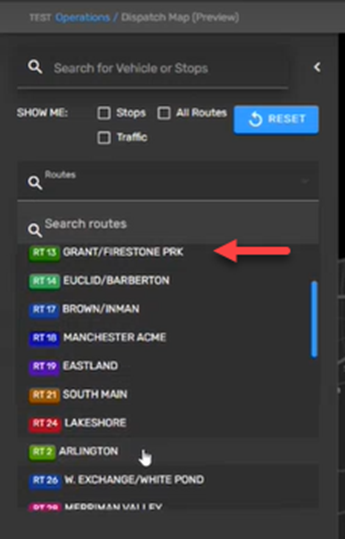
When searching by Routes, you can pick any route(s) from the drop-down.

When searching by Routes, you can filter the results by Vehicle Type. Fixed route vehicle types will always display on the map, subject to other active filter categories (ex: Filtering by fuel type will always show fixed route vehicles of the selected fuel types, along with any other vehicle types selected that have the filtered fuel types).

You can further filter the results by Fuel Type, but you must first select a Route or Vehicle Type.
Checking the Stops checkbox will show all the stops on any selected route.
Clicking on the Reset or Reset Filters buttons will reset/deselect all the picked options, and the map will show no routes.
Zoom in
There are 3 different levels of zoom views. The furthest shows routes and vehicles.
When you start zooming in, small icons for stops will start coming up on the map.
And if you zoom in even closer, you will see larger icons for stops and distinctions between stop and route colors. Some stop icons will show two, three, or even more colors representing their use across different routes.
Stop and Vehicle Icons
The rainbow icon for a stop represents more than three routes that go through/ service that stop. The information card will show the list of all the routes:
Charging stops are shown with a black plug displayed in the middle of the icon.
Clicking on the Charging stop will show the information card for that stop with the same charging icon in the left top corner of the card.
When viewing routes, a vehicle's icon now shows the vehicle’s current heading.
See Live Map Legend for definitions of all the Live Map icons, including different fuel types, alerts, and stops.
If the charge is too low on an electric bus, you can alert the vehicle operator. Click the button on the Vehicle's card and select ALERT THE BUS DRIVER.
Vehicle Card
Clicking on the vehicle icon will show the card with the vehicle info: Bus #, Route, Driver, Run #, Trip #, Direction, Speed, Load Capacity, Charge Reminder (if applicable), Upcoming Stops, etc. At the bottom of the card three links will lead the user to the Add Incident page, Decision Support section or Route Ladder functionality.
LOAD shows the number of filled seats out of the total number of seats on the bus (example, 38 filled, 40 total). The load status bar also indicates how full the bus is by changing color. Green is less than 50% full, orange is 50-90% full, and red greater than 90% full.
TIPS: Enter vehicle capacities on the Fleets Card> Transit Assets. Set thresholds for capacity on the Routes Card.
CHARGE shows the charge percentage remaining for electric buses. The charge status bar also indicates how full the battery is by changing color. Green is 30%+ full, yellow is 15%-29% full, and red 14% or less full.
The Follow/Unfollow button allows the user to follow a specific vehicle for closer monitoring. This button toggles between Follow/ Unfollow. When following a vehicle, the map will pan and adjust to continue following this vehicle’s route. Press 'Unfollow' to stop following the selected vehicle.
The icon that displays on Live Map is exclusively determined by the Fleets fuel type setting.
Map Layers
There are a couple of additional layers that can be added to the map. One of them is a traffic overlay. Checking the Traffic checkbox will show busy areas highlighted in red. See Live Map Legend for more detail.
The toggle button switches between a standard street map and satellite imagery.
If there are several vehicles in one spot, the map will show the bubble with the number on it indicating the number of vehicles clustered together in that location. This makes it easier to quickly see at-a-glance where there is a high density of vehicles in a particular location. Clicking on the icon quickly zooms into that area to view the individual vehicles' icons.
Communications Dock
Clicking the Comms icon in the upper right expands and presents the user with the Communications dock. The Communications dock displays the Comms Queue, Queued Messages and Message History in separate tabs.
Comms Queue tab shows the items that are in the Comms queue.
Dispatch Acknowledgement Buttons
TAKE RELEASE LOG
Take, Release, Log buttons - These buttons are used by dispatch to take, release, log the communications.
Queued Msg tab shows the items that are queued to send. The Active tab shows active queued messages and the Expired tab shows only expired messages. The user can copy or edit messages here.
On the Message History tab the user can see the list of sent texts and messages.
On the Text History tab the user has to select a vehicle to view text history for the vehicle. On the Sent Messages tab the user can see the list of all sent messages. The Show Only My Messages checkbox allows to see only user's messages.
The Auto Response link in the top right corner of the page opens the Auto Response page and allows the user to select the Talk Group and Call Duration and enable it.
The Voice Call tab allows the user to select the recipient, voice call type (one-way or two-way), duration, and talk group. For VoIP enabled systems, call duration is not selectable.
For the Recipient there are several options to select from: fleet groups, vehicles, operators, runs, and routes. This gives the user the ability to broadcast the call or text message to groups of recipients if necessary.
Voice Call Duration can be set up so that the calls timeout. It makes sure the radio doesn't overheat and become damaged.
The Search section allows you to search for specific recipients. The search results will update dynamically, using pattern matching, as you make entries in the search field. Users have the option to clear the search query and revert to viewing all available recipients.
After selecting the Recipient, Call Type, Duration and Group, the user can click the Call button to place a call.
The Text Message tab allows the user to select the Recipient, choose if the message will require acknowledgement or not or if it will require a Yes/No answer, write the text message and then send it. Users are also able to select from canned text messages.
The Store & Forward checkbox allows the user to store and forward the text message with particular parameters. The Edit button allows the user to select a date, time, if it's recurring and what day of the week to repeat it.
The system will store this text message until the selected vehicle is available. Messages will be delivered during the time window if vehicles are online.
After clicking Send, the message will pop-up saying the message was sent out successfully.
Dispatcher Take, Release, Log
Only a single user can take/release an event at one time. If a user takes and logs an event and there is an error on the log the event will remain in the queue, since the log failed and will remain taken in the "Open" status for the user. If there is no error on the log the event will no longer be in the queue. If the log was successful the event will be removed from the queue.
Emergency Alarm Event Handling
In the event the driver presses the EA button an Emergency notification is displayed on the Live Map screen.
After the emergency alarm is acknowledged, the emergency event will show in the Events log. Right-clicking on the event allows dispatch to Take, Release, Log, and make a Covert Call ( if configured for the agency).
After acknowledging the emergency alarm, the Dispatcher will take the EA, which sets the blinking time colon on the MDT to a solid state. After Dispatch takes the EA they can initiate a covert call or choose to log the EA. If a covert call is initiated, the solid time colon on the MDT will disappear, indicating the vehicle is in an actively monitored covert call. The colon will return to blinking after the covert call has ended and the alarm has been logged.
VoIP Communication
On the Communications dock for VoIP the user cannot set the duration for the call but can select different voice extensions as the Recipient. The rest of the functionality remains the same as for the Radio Comms dock.
Details on the Full Screen Communication section can be found in the Communications ETMS article.
Comms Dock Demo Video